Create a workspace from an AI model
The Workspace from AI Model feature streamlines the creation of AI-ready development workspaces pre-configured for deploying and profiling machine learning models on Analog Devices microcontrollers. This workflow is optimized for quickly evaluating model compatibility and performance on target hardware.
Overview
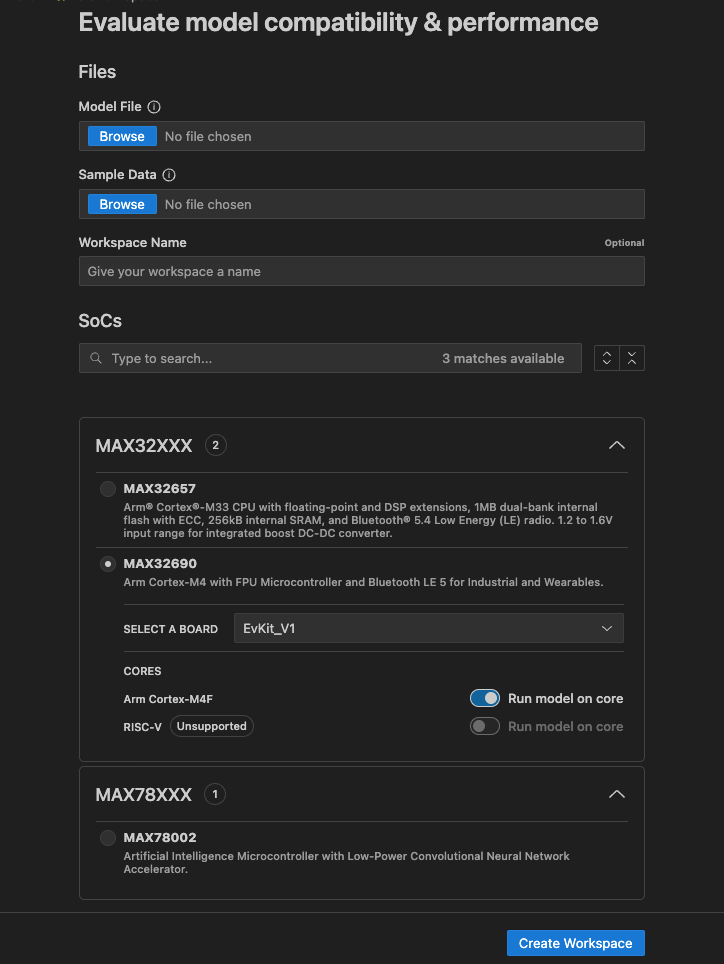
Use this feature when you want to:
- Quickly evaluate an AI model on Analog Devices hardware
- Automatically generate a workspace pre-configured for AI deployment
- Check model compatibility with target processor cores before committing to development
- Profile your model's performance (inference time, memory usage) on actual hardware
This workflow is optimized for ML engineers who want to move from a trained model to hardware evaluation with minimal embedded systems knowledge. The feature automates workspace creation, model integration, and compatibility checking.
For general-purpose development without AI models, use the standard Create a new workspace workflow instead.
Before you start
Ensure you have the following:
- AI model file: A trained model in a supported format (
.tfliteis commonly used for TensorFlow Lite models). For a complete list of supported formats, see Supported AI model formats. - Sample input data (optional): Test input data matching your model's input format. Example data files are available in the CodeFusion Studio repository at
cfs-ai/examples/(for example,hello_world_f32.binfor thehello_world_f32.tflitemodel).
Create a workspace
-
Click the CodeFusion Studio icon

 in the VS Code activity bar.
-
Click New Workspace from AI model.


-
In the Files section, configure your model and workspace settings:
- Model File (required): Click Browse to open the Model Zoo, then select a model from the library or a local file. See Select a model from the Model Zoo.
- Sample Data (optional): Click Browse to select sample input data for testing. When you select a Model Zoo model that provides sample data for the chosen quantization, this field is populated for you. For the hello_world examples, use the corresponding
.binfile (for example,hello_world_f32.binforhello_world_f32.tflite). Example data files are located in thecfs-ai/examples/directory of the CodeFusion Studio repository. - Workspace Name (optional): Enter a custom name for your workspace. If left blank, the system generates a name based on your SoC and package selection (for example,
MAX32690-TQFN).
-
In the SoCs section, select your target hardware:
- Use the search box to filter the list of available System-on-Chip (SoC) options
- Select the SoC that matches your hardware (for example, MAX32690, MAX78002, ADSP-SC5xx)
- Compatible SoCs display a Compatible badge after model compatibility checking completes
Note
Only SoCs with AI profiling support appear in this list. The catalog is automatically filtered to show compatible hardware. Compatibility checking runs automatically when you select a model file.
-
After selecting an SoC, select your development board from the Board menu. If only one board supports the selected SoC, it is selected automatically.
-
In the Cores section, select which processor cores should run your AI model:
- Each core in the SoC is listed with its support status
- Supported cores show a toggle labeled Run model on core
- Unsupported cores display an Unsupported badge and cannot be selected
- A supported core is initially pre-selected. When compatibility results are available, the selection is updated to a compatible core if one is found; otherwise, it is cleared
- Turn the toggles on or off to change the selection; you can select multiple cores
-
Click Create Workspace.
The system validates your selections, generates the workspace, and automatically opens it in a new VS Code window.
Select a model from the Model Zoo
The Model Zoo is a library of AI models hosted by Analog Devices. When you click Browse on the Model File field, the Model Zoo opens so you can browse, search, and filter models, or select your own model from a local file.
Select a model as described in Select a model from the Model Zoo. The model file field is populated in the Files section, along with the sample data field when the model provides sample data for the chosen quantization. The wizard keeps your selection and checks it for compatibility as you choose your SoC and cores in the later steps.
You can access models from a custom Model Zoo. See Use a custom model zoo.
Field descriptions
| Field | Required | Description |
|---|---|---|
| Model File | Yes | The AI model to deploy. Select a model from the Model Zoo, local file or URL. Supported formats include .tflite (TensorFlow Lite), .pth.tar (PyTorch), and others. See Supported AI model formats. |
| Sample Data | No | Test input data matching your model's input format. Must be a binary file (.bin) containing the input tensor data. Example files available in cfs-ai/examples/ directory (e.g., hello_world_f32.bin). |
| Workspace Name | No | Custom name for the workspace directory. If omitted, auto-generates as {SoC}-{Package} (e.g., MAX32690-TQFN). |
| SoC | Yes | Target microcontroller family. Only SoCs with AI plugin support are shown. Compatible SoCs display a Compatible badge after automatic compatibility checking. |
| Board | Yes | Specific development board variant. Available options depend on the selected SoC. Automatically selected when only one board is available. |
| Run model on core | No | Toggle for each supported processor core. Enable to target that core for model deployment. |
Opening the workspace
-
The workspace is generated in your configured workspace location (typically
~/cfs/2.3.0/)-
The generated workspace includes a complete AI application that:
- Loads your model file into memory
- Runs inferences based on the provided data:
- If sample data is provided, runs for
(sizeof(dataset)/sizeof(model_input))iterations - If no sample data is provided, runs 10 inferences on random input data
- If sample data is provided, runs for
- Generates profiling information during execution
-
-
VS Code automatically opens the new workspace
- A build process starts automatically to compile the AI application
- The AI Hardware Profiling view (
.cfs/ai.cfsaiproffile) opens
Next Steps
- Deploy and profile your AI model - Set up hardware connections and run the model on your development board
- View Compatibility Report - Check detailed compatibility analysis for each processor core
- View Resource Profiling Report - Analyze performance metrics and memory usage