Recording
Record what you did, so someone else — or future you — can replay it. A recording captures the sequence of operations you perform in Evaluation Studio and saves it as a small file you can share. A colleague with the same board can import it, press Play, and watch the same session rebuild itself: the board opens, the views change, the capture runs.
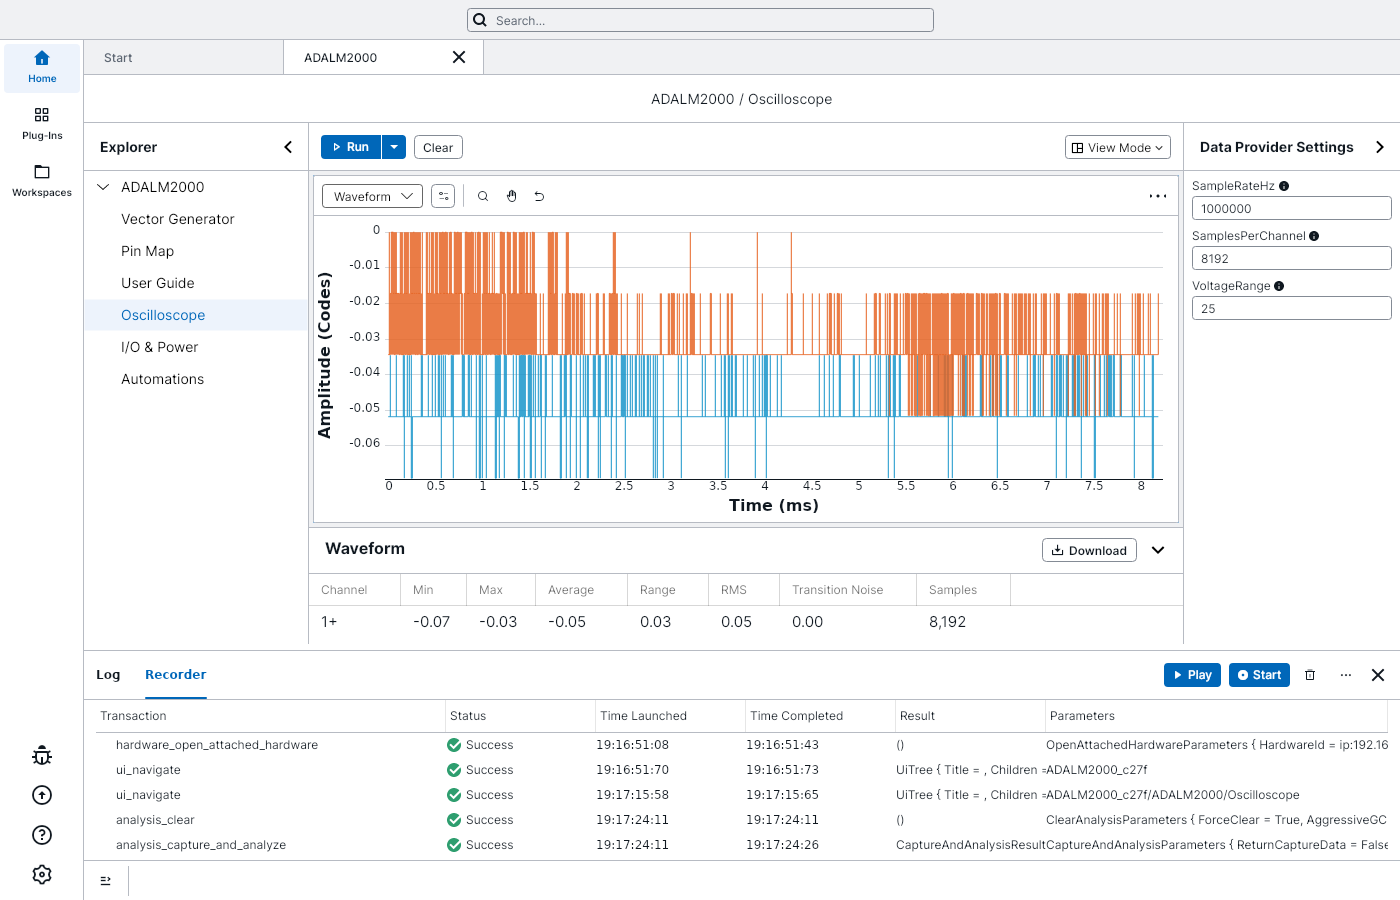
A recorded session: opening an ADALM2000, navigating to its Oscilloscope, and running a capture — five operations in the Recorder, all green.
What a recording captures
Evaluation Studio tracks each meaningful operation — opening hardware,
switching to a device page, running a capture — as a transaction, and
that is what the recorder collects: the operation and the settings it ran
with, in order. The names you see in the Recorder grid (ui_navigate,
analysis_capture_and_analyze) are these operations' ids — the same ids
used by scripting.
Warning
A recording is a list of operations, not a screen or input recording — no video, no mouse movements, and no captured sample data are stored. To share measurement data, export it from the analysis view instead.
Exactly which operations make the list
Only top-level operations you initiate are recorded. Two kinds of activity are deliberately left out:
- Internal sub-steps. One click can fan out into many smaller operations; the recording keeps the one you performed.
- High-frequency background operations. Live-updating activity such as continuous capture runs quietly and is not added to the recording — a single Run capture is recorded, a continuously-running one is not. Adjusting values in device panels is also generally not recorded.
If you are unsure whether a step made it in, check the Recorder grid — it fills in live while you record.
Record a session
The Recorder lives in the panel at the bottom of the main window, next to the Log.
-
Expand the bottom panel — click the ☰ panel toggle at the left end of the status bar — and switch to the Recorder tab.

-
Click Start. The button changes to Stop — recording is on. Starting a new recording clears the previous one.
- Do the work you want recorded — open your board, navigate, run captures. Each operation appears in the grid as you go.
- Click Stop.

Each row is one recorded operation: what ran, whether it succeeded, when, and with which settings.
Tip
Right-click a row and choose Logs to jump to the Log tab filtered to just that operation — handy when a step didn't do what you expected.
Play it back
- Get the app into a comparable starting state — most importantly, the hardware the recording uses must be reachable.
- Click Play. The steps re-run one after another, and each row shows its progress: Loaded → Running → Success.
Playback is sequential and honest: if a step fails, playback stops there, the failed row shows the error, and the remaining rows stay Loaded.

Playback stops at the first failure — here the board opened, but a later step couldn't find its target and everything after it was skipped.
Note
Steps that target hardware are re-resolved against what is connected now. If the device isn't attached — or it reopened under a different identity than when you recorded — the step that needs it fails and playback stops.
How timing works during playback
Steps replay back-to-back; the pauses you took while recording are not reproduced. The exception is a continuously-running operation with a meaningful duration — it is replayed for as long as you originally let it run, then stopped.
Share a recording
- Click the ⋯ button in the Recorder toolbar and choose
Export Recording. The default location is the
Recordingsfolder in your Evaluation Studio data directory; the success message offers Open Folder. - Send the file — it is a small, human-readable
.json. - The recipient chooses ⋯ → Import Recording, picks the file, and presses Play.
What the recipient needs for the import to work
- The same plug-ins. A recording references the plug-ins whose operations it contains. Installed-but-unloaded plug-ins are loaded automatically on import; missing ones make the import fail.
- Compatible versions. A recording made on a much newer or older Evaluation Studio may reference operations that no longer exist under the same identity.
- The hardware. Importing works without it, but playback stops at the first step that needs the missing board.
Troubleshooting
| Symptom | Cause | Fix |
|---|---|---|
| A step you performed isn't in the grid | It was an internal sub-step or a quiet background operation — not everything is recordable | Record the enclosing action instead (e.g. a single Run rather than continuous mode) |
| Playback stops on an early step with a path-like parameter | The recorded step targets a device identity that doesn't match the currently open one | Close and reopen the hardware, then play again from the start; make sure the same board type is connected |
| Import fails with a type or plug-in error | The recording uses a plug-in that isn't installed on this machine | Install the plug-in the recording was made with, then re-import |
| Play is greyed out | There is nothing loaded — the grid is empty or a recording is in progress | Stop recording first, or import a recording |